Breezy Rider
"Get all Fired up over Science"
Teachers Manual
2006
school year
Version I
A
Short History of Hot Air Ballooning
On
Their family owned a wallpaper manufacturing business, and had plenty of
material with which to experiment.
When Joseph returned to Annonay, he and his brother began their
experiments. On
. . . a ram, a duck and a chicken?
The
After filling the balloon with thick black smoke from a huge fire pot built in the center of a platform and beneath the balloon, they attached the cage containing the first three aeronauts. When they released the ropes that were restraining the balloon, it rose to 1650 feet and then gently descended a little less than two miles away. Most references of the event report that the passengers landed unharmed. Although one version reports that the chicken had a broken wing but goes on to say that the mishap was the result of the ram stepping on it and had nothing to do with the balloon. The report also points out that the three animals lived out a long life in Marie Antonettes’ Royal Zoo.
. . . first manned balloon
flight
On
Finally, on
Over the next half century, many “smoke balloon" flights took place in many different countries but this mode of transportation, although quite intriguing, was not very practical and slowly died out due to the lack of a controllable heat source. The science was still quite new and many of the early experimenters attributed the “magic” lift to the smoke and not the heat resulting in the frequent references to "smoke balloons." The open fire pot in the middle of the platform with its hot embers and rising ashes and sparks resulted in holes being burned in the balloon envelope and was also quite dangerous on a windy day, especially when landing in a dry grassy field. One can only imagine some of the unfortunate flights and incidents, now lost in history, of burning fields, stampeding livestock and irate farmers.
. . . rebirth of hot air ballooning
On
By 1978, the
sport of ballooning had grown from a dozen balloons to about 500. Today, there
are over a dozen manufacturers. The
Lesson
Plan
OBJECTIVE:
- To introduce the student to Hot Air Ballooning
ELEMENTS:
- Flight Planning
- Balloon Layout and inflation
- Fundamentals of level flight
- Ascents and descents
- Normal approach to landing
- Post-flight discussion
EQUIPMENT:
- Balloon Flight Manual
- Airworthy balloon
Instruction’s Action:
- Before flight, discuss lesson objective by using preflight lesson plans for Flight Planning, Use of Blast Valve, Layout and Inflation, and Fundamentals of Level Flight.
- Demonstrate all elements of planning, layout, inflation and flight allowing student to perform after each demonstration and coach student practice
- Post-flight critique of student performance and make study assignment
Student’s Action:
- Student should observe instructor's demonstrations and practice activity with coaching from instructor.
Flight Planning
- Weather
briefing -
- Observe surface winds-pibal
- Select launch site - landowner permission
- Plot flight path
- Weight and pressure
Blast Valve Operation
Layout and Inflation
- Check-list
- Crew briefing
- Layout direction
- Attach cables and install burner
- Fuel system check
- Fuel quantity
- Inflation restraint
- Instruments - calibrate to elevation or pressure
- Attach envelope
- Cold inflation-fan operation
- Walk around inspection
- Recheck weather and weight
- Checklist-hot inflation
- Hot inflation
Launch
(Simulated)
- Passenger Check List
- Equilibrium-launch checklist
- Weigh-off
- Controlled ascent
Deflation
- Landowner relations
- Supervise crew
Refueling
Completion Standards
Student should have a general understanding of a balloon assembly and preflight, disassembly and fueling and be aware of what standards will be required to be a competent pilot.
FLIGHT PLANNING
Objective Elements:
- To develop the students skill in planning a flight
- Observe wind and weather conditions from the weather channel, radio and visually by use of pibal
- Call flight service station for weather briefing
- Select launch site
Equipment
- Weather information form
- Sectional chart and road map
- Plotter
- Compass
- Pibal
Instructor's Action
- Discuss lesson objective
- Obtain weather information
- Observe surface winds with Pibal
- Determine launch site
- Draw dead reckoning line in direction of flight and mark off distance or time on the line
- Suggest landmarks to verify position in flight
- Airspace considerations
Student’s Actions
- I'M
- Obtain
weather briefing from Albuquerque Flight Service Station (
- Draw flight plan approved by instructor
Completion Standards
- Student should demonstrate ability to obtain complete weather briefing from the FAA Flight Service Station and correlate this information with observed weather conditions
- Locate launch site on chart
- Draw proposed course with time tricks on dead reckoning line
- Understands need for flexibility to adjust flight plan
- Selects landmarks in flight to verify position
FAA Airman's Information Manual
By Mark Bralley
(From lecture at
AN ACRONYM TO REMEMBER:
I'M
I = Illness
Do you have an illness that will make you less safe in the job or position you will have while ballooning?
M = Medication
Are you taking some form of medication (prescription or over the counter) that will make it illegal if you pilot the balloon or make you less than 100% in handling your crew position?
S = Stress
Is there stress in your life that will affect the judgment calls you will have to make as a member of the balloon team?
A=Alcohol
Are you legal? Has it been 8 hours (FAR 91.11) since your last alcoholic drink? Do you have such a hangover that you won't be 100% efficient?
F = Fatigue
How tired are you? Fatigue is described as a depletion of body energy reserves leading to below-par performance. Acute fatigue is short term and chronic fatigue is long term. If needed, would you be able to and act fast enough to avoid an incident and/or accident?
E=Eating
When was the last time you ate? What are you running on and how long will it last?
Any pilot or crew who is not in top condition is severely handicapped. Alcohol is a depressant. If in addition, you happen to be fatigued, hungry, or under stress the handicap will be compounded. Hangovers can be just as hazardous.
Title 14 of the Code of federal Regulations Part 91.11
a. No person may act as a crew member of a civil aircraft
i. Within 8 hours after the consumption of any alcoholic beverage,
ii. While under the influence of alcohol, or
iii. While using any drug that affects their facilities in any way contrary to safety.
b. Except in an emergency, no pilot of a civil aircraft may allow a person who is obviously under the influence of intoxicating liquors or drugs (except a medical patient under proper care) to be carried in that aircraft.
If you pass all of these points and can say
'I'm safe', then go out and enjoy the sport and have a safe time
ballooning.
Blast Valve
Operation
Objective
- How blast valve functions
- Use of blast valve for altitude control
- Economy of blast valve operation
- Safety considerations
Equipment
- Balloon system ready for preflight function check
- Cross section drawing of blast valve
Instructor
- Pre-flight discussion of how blast valve operates including use of "O" ring(s) to create seal.
- Best operation is all the way on or all the way off. Short frequent fifing is more efficient than long firing bursts Explain oxygen starvation at surface and at high altitude
- When blast valve is locked open, pilot’s hand should not let it go, nor should the pilot use the blast valve as a hand hold in flight and especially on landing
Student’s Actions
- Demonstrate actual blast valve operation on ground
- Discuss construction of blast valve and possibility of an "O" ring leak
- Discuss safe and efficient operation
Completion Standards
- The student should demonstrate knowledge of blast valve operation by operating blast valve in simulated flight and by oral quiz
Layout and
Inflation
Objective
- To develop the student's skill to prepare the balloon for flight and its inflation
Elements
- Launch site selection
- Crew briefing
- Layout and assembly
- Cold inflation
- Hot inflation
Equipment
- Balloon to be prepared for flight
- Balloon Flight Manual
- Checklists
Instructor's Actions
Provide student with complete checklist covering all procedures through lift off
Discuss elements of launch site selections including-
- Time of launch
- Surface wind
- Condition of the field surface
- Hazards in vicinity of field
- Access to field with landowner approval
- Flight planning considerations
Discuss elements of crew briefing including:
- Assign and explain “duties to crew”
and designate crew chief
- Supervise crew activities and Tips for
the Crew
- Set up means to communicate with crew (Radio and Cell Phone Backup)
- Explain flight plan to crew
- Lost balloon arrangement
Discuss elements of layout and assembly, visual inspection including:
- Use Checklist to assemble balloon
- Lay out balloon for direction of surface wind
- Configure, put together, basket and install burner
- Check all connections and valves for leaks, the Square-Ring
- Check fuel supply and pressure
- Fire all burners, test all fuel tanks and clear fuel lines safely
- Attach inflation restraint securely
- Attach envelope cables, temperature cable and vent line
- Determine weight and altitude limits
- Check basket, documents and instruments
- Extra igniters and other required equipment
- Final crew briefing
- Recheck wind and weather conditions
- Note any discrepancy and determine whether the balloon is safe for flight or requires maintenance
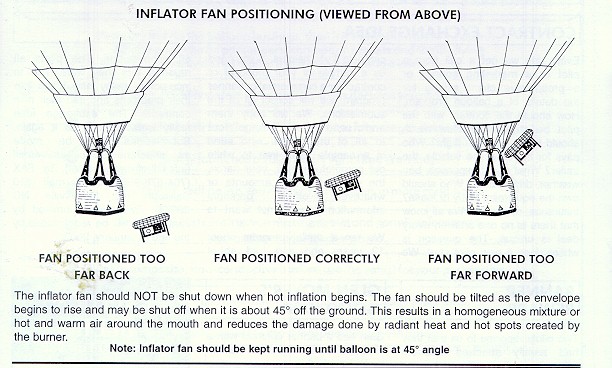
Discuss elements of cold-inflation including:
- Placement and safety inspection of
inflation fan; fuel requirement
- Inspect fabric and load tapes
- Install
top
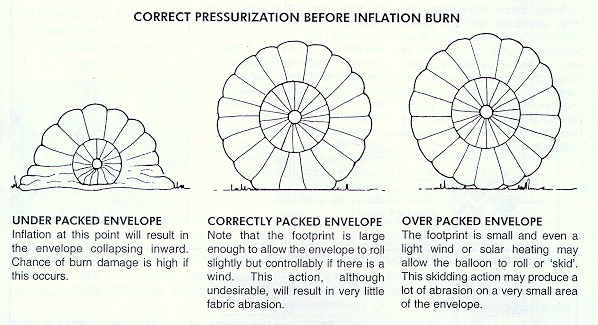
- Cold inflate until envelope is fully
packed
Discuss elements of hot inflation including:
- Complete walk around inspection
- Recheck weather
- Use checklist before hot inflation
- Rapid and smooth hot inflation
- Abort inflation if necessary
- As balloon comes to the upright position, all crew weight on
- When balloon stabilizes, attach crown line and start checklist for launch
Student's Actions
- Perform each element of an inflation in accordance with the Balloon Flight Manual and checklists
Completion Standards
- Using
a student developed checklist
- The student should demonstrate a complete inflation performing it smoothly with the outcome never seriously in doubt.
Common Student Errors:
The instructor should anticipate the common student errors associated with
a. Launch site selection
- Inability to properly assess size and surface condition of site
- Failure to consider site accessibility and obstacles
- Failure to properly determine direction of flight and suitable landing areas based on launch site selection
b. Crew briefing
- Failure to designate a crew chief
- Failure to brief crew
c. Layout and assembly
- Failure to observe wind direction, surface and hazards
- Improper assembly of burner and fuel system
- Improper layout and attachment of envelope, cables and lines
d. Visual inspection
- Failure to use checklist
- Inability to recognize discrepancies
- Distractions that interrupt a visual inspection
e. Inflation
- Failure to use a checklist
- Improper positions or operation of fan
- Not understanding cold air inflation
- Incorrect procedures during initial ignition and heating
- Failure to reach equilibrium and stabilize balloon
- Improper tie-off procedure
f. Pre-launch
- Acceptance of inadequate burner pressure
- Failure to review launch conditions
- Failure to conduct final coordination with crew
- Improper recognition of equilibrium and adjustments required
- Failure to use a checklist
NOTE: The hot inflation, when done correctly, is a thing of beauty. A fully cold-air-packed envelope, taut envelope cables, the right pressure on the crown line and a well-timed burn by the pilot make the task look easy. Sometimes the conditions make the inflation more difficult. These include a crowded or uneven launch field or variable or high wind conditions. Your student should experience these conditions. Patience is the key to success.
The instructor should do a walk around inspection before the student starts the hot Inflation. He should check the security of the tie-off and the quick release mechanism.
If this is the first inflation for the student, the instructor demonstrates the back step into the basket before the inflation. The student should be warmed to burn only when he is looking at the burner and mouth of the envelope. The mouth should be round not oval from excess crew handling. Sometimes to get the round opening, the throat crew actually has to move towards the center of the throat and not pull away from it.
The instructor positions himself along side the student just outside the uprights on the side with the deflation line. The fan is placed on the opposite side. The instructor crouches down next to the student. Because of the noise of the fan and burner, a positive hand signal is needed to stop a burn. This can be a hand on the shoulder of the student.
Before the pilot light is lighted, a checklist is needed. The purpose is to check the balloon integrity by starting with the inside crown of the envelope and following the envelope rigging to the basket connections. The student extends his/her arm and points to each cable connection and announces secure, deflation line attached, valve secure, cables taut and instrument wire attached. This is the moment when a pilot's concentration is broken due to the excitement of the hot inflation. If you stop for a checklist, it gives the pilot time to think. Now light the pilot light.
The best inflation is a quick one. A half inflated balloon can be troublesome, so a continuous burn is most efficient. If the student stops burning during the inflation prematurely, the envelope will rise with the basket still flat on the ground. At this point, burning the bottom of the throat becomes a possibility. The Instructor will have to lift the up rights to position the burner to continue the inflation.
Having crew lift the uprights is sometimes an indication of a poor inflation. Either the crown line was not held firm enough or the pilot did not burn continuously. A continuous burn will not be harmful to your fabric if the flame is directed to the center of a well-packed envelope.
Students have a habit of taking their eyes off the burner flame when back stepping into the basket as it rises. The pilot should have a continuous, uninterrupted motion from the crouch or kneeling, to standing, to back stepping and into the upright basket position. All this is accomplished without taking your eyes off the round target (the mouth) into which the burner is firing.
Crew
Positions and Responsibilities
Inflation
Crew Chief
· Communications between pilot and crew
· Watches inflation-anticipates problems and instructs crew accordingly
· May work fan
· Puts top in-matches Velcro tabs by numbers, aligns Velcro tabs exactly
Crown Line Person(s)
· Always holds crown line-watches wind
· Holds balloon down when not completely cold inflated
· Controls roll of envelope
· Maneuvers crown lien to basket when told-stay behind basket after connecting crown line to basket
Throat Persons
· Holds mouth open during cold inflation
· Connects envelope to basket
· Pulls envelope out of envelope bag-pulls at load tape/seam junctions only
Fan Person
· Watches for pilot instructions on adjusting the fan speed
· Pulls fan away after pilot instructs fan be turned off
Chase
Crew Chief
· Directs launch site pack up
· Drives or assigns another person to drive
· Operates radio or assigns another person to operate radio
· Wind-communicates speed and direction
Navigator
· Assign by crew chief
· Follows balloon and reviews map as the chase progresses
· Operates the radio
Chase Crew (includes Crew Chief)
· Secures all equipment in truck
· Watches balloons progress
· Watches for flags, smoke, trees, and other wind indicators
Landing
Crew Chief
· Directs crew-sends crew to assist balloon landing
· Designates crewmember to get landowner’s permission
· Directs pack up
Crew
· Stay behind moving basket
· Weight on when instructed
· Do not weight-off until instructed UNLESS
- Any part of you is under the basket when basket is not on ground
- You are begin lifted off the ground by basket
· Clear area of damaging debris
· Pull crown line to bring balloon down when told
· Pack envelope
· Load basket and envelope on truck
CREW
TIPS
Inflation
- Check launch field for foreign objects that could damage balloon.
- Handle envelope only by load tapes (Use gloves).
- Keep spectators (especially children) clear of inflator fan.
- No Smoking!
- Don't pretend to understand instructions, ask if you don't know.
Chase
- The driver drives! Others can watch the balloon
- Keep to main roads until landing and obey all traffic laws.
- Maintain visual contact with the balloon; keep radio talk to a minimum.
Launch
- Apply 'weight on' to the basket as balloon comes upright.
- Conduct final checklist; radio working, keys with driver, etc.
- Remove weight as directed by pilot; keep yourself and spectatof6 clear downwind of the balloon.
- Load and secure all equipment.
- Police the area.
Landing
- Advise pilot of any hazards at indicated landing site (locked gate-5 fences, power-lines, livestock, etc.
- Obtain landing and recovery permission from the landowner.
- Assist pilot as necessary with drop-line or high wind landing.
Recovery
- Respect and protect landowner's property. Do not cut fence or locks.
- Check landing site for foreign objects that could damage envelope before deflation.
- Repack envelope same way every time.
- Reload and secure all equipment and police the area.
- Thank the landowner.
- Save post-flight celebrations for appropriate locations (not private property).
Check List to
assemble balloon